Setting up your first digital beer board doesn’t have to be overwhelming. The global digital signage market is projected to reach $54.69 billion by 2034, with bars and breweries leading the adoption of dynamic menu displays. 80% of brands using digital signage report an increase in sales, with some seeing a rise of up to 33%, making this investment both practical and profitable.
Digital beer menu boards eliminate the challenges of keeping up with ever-changing menus. No more erasing and updating chalkboards continuously—your staff can focus on serving customers while your digital display handles the menu management automatically.
Understanding Digital Beer Board Basics
What Makes Digital Beer Boards Essential
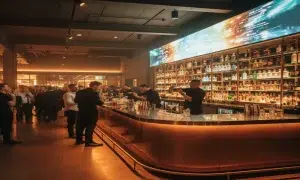
Digital beer menu boards are screens that display your menu in real time—whether behind the bar, at the counter, or anywhere guests make decisions. Unlike traditional chalkboards that become messy and clouded after a few erases, digital menu displays provide crystal-clear legibility even in dim settings.
The advantages go beyond simple visibility. Digital drink menu systems come with a user-friendly website where you can control the display from any online device. You can even update the drink list from your phone without being present at the bar or restaurant.
Key Components You’ll Need
Display Screen: Commercial-grade display screens (43″–55″ typically work best) for optimal visibility and durability
Media Player: Digital signage media player (Chromebox, Amazon Fire Stick, or Android box) to power your content
Software Platform: Digital menu software that offers real-time updates and beer database access
Mounting Hardware: Secure mounting equipment or stands for proper positioning
Internet Connection: Stable Wi-Fi or Ethernet connection for content updates and management
Step 1: Choosing the Right Display Hardware
Screen Selection Considerations
When choosing a TV for your digital menu board, LED displays are generally more expensive than LCD options, but they have a brighter display with more contrast and use less power. For most bar applications, this improved visibility and energy efficiency justify the additional investment.
Resolution Requirements: 1080p is the industry standard for high-definition, crisp images, though many businesses can get by with 720p. While 4K is available, you’re unlikely to have the resources to produce 4K content, and customers won’t see a major difference compared to 1080p.
Size and Placement Strategy: Your goal should be to get the most possible eyes on your menu at any given time. Sit at different tables and bar areas to get a sense of visibility from various angles before making final placement decisions.
Commercial vs. Consumer Displays
Consumer-grade screens aren’t designed to meet the demands of restaurant use. Commercial-grade displays offer several advantages:
- Extended Operating Hours: Designed for 16/7 or 24/7 operation vs. 8/7 for consumer TVs
- Enhanced Durability: Built to withstand commercial environments with better heat dissipation
- Professional Features: Advanced mounting options and connectivity designed for business use
- Warranty Coverage: Commercial warranties that account for business usage patterns
Cost-Effective Options: For budget-conscious installations, Amazon Fire TV 2-Series TVs or Amazon Fire TV Omni QLED Series TVs range from $100-$400 for basic functionality and work well for 8/7 operation schedules.
Step 2: Selecting Your Media Player
Popular Media Player Options
Digital menu boards are typically powered by a device that plugs into a television, ranging from a tiny USB drive up to a Raspberry Pi. Your choice depends on your technical comfort level and feature requirements.
Amazon Fire TV Stick: Cost-effective and easy to use, ideal for straightforward menu displays with reliable performance and simple setup.
Raspberry Pi: Evergreen’s preferred device is a Raspberry Pi, which is a mini-computer that runs custom software and can plug into any TV via HDMI. This means you can use just about any TV on the market.
Android TV Box: Suitable for platforms that support Android-based digital signage applications with good performance and flexibility.
Chromebox: Higher-end option offering robust performance and excellent integration with cloud-based management systems.
Hardware Requirements by Platform
For Android-Based Players:
- Processor: Quad-core Cortex-A72 (ARM v8) 64-bit SoC @ 1.5GHz or higher
- RAM: 2GB or more
- Storage: 16GB or more internal storage
- Connectivity: Wi-Fi, Bluetooth, and Ethernet
- Video Output: HDMI (preferably micro HDMI)
For Fire OS-Based Players:
- Processor: Quad-core CPU 1.7GHz, GPU 650MHz or higher
- RAM: 1GB or more
- Storage: 8GB or more internal storage
- Connectivity: Wi-Fi, Bluetooth 4.1
- Operating System: Fire OS 5.6.0 or later
Step 3: Choosing Your Digital Menu Software
Essential Software Features
Your software controls what appears on the screen, making this choice crucial for long-term success. Look for platforms that offer:
- Easy drag-and-drop menu editor for quick updates
- Real-time updates from any device for operational flexibility
- POS integration capabilities for automated inventory management
- Branding control options to maintain visual consistency
- Support for food, drinks, events, and specials in one platform
Evergreen’s Comprehensive Solution
Evergreen offers all essential features plus specialized brewery capabilities:
Beer-Specific Features:
- Access to a verified database of over 300,000 beers for accurate descriptions, ABV, brewery info, and style tags
- Built-in keg tracking and auto-86’d item support
- Easy transition support from Untappd for Business users
- Template options optimized for beer-focused displays
Customization Capabilities:
- Fully customizable designs that reflect your brand with hundreds of font options and complete color wheels
- Landscape and portrait orientation support for flexible mounting options
- Custom design assistance available for unique requirements
Alternative Software Options
Step 4: Physical Installation Setup
Optimal Placement Strategy
Placement Considerations:
- Maximum Visibility: Position where the most customers can see your menu simultaneously
- Safety First: Don’t go with extreme cheaper solutions and make sure you have enough space for your display
- Eye Level Mounting: Install at natural viewing height for standing customers
- Lighting Conditions: Account for ambient light and potential glare issues
Consider professional installation, especially for large screens or tricky installations. Professional installation ensures safety and proper setup, though many businesses choose DIY installation to save costs.
Mounting and Connection Process
Physical Setup Steps:
- Mount Your Screen: Connect your screen and mount it securely using appropriate hardware
- Power Connections: Ensure adequate power supply and surge protection
- HDMI Connection: Connect the media player to the screen’s HDMI port
- Network Setup: Connect to your Wi-Fi network or ethernet for stable connectivity
Cable Management: Keep all cables organized and secured to prevent disconnection during service and maintain a professional appearance.
Step 5: Software Installation and Configuration
Account Setup Process
Create Your Management Account:
- Go to your chosen platform’s website and click “Sign Up” to create an account
- Log in and access your dashboard to begin designing and arranging your digital beer menu content
- Cloud-based platforms allow easy remote updates with user-friendly interfaces
Device Pairing and Setup
Connect Your Display to Software:
- Open your dashboard and navigate to the “Screens” section
- Click “Add Screen” and enter the 4-digit code displayed on your TV
- Name your screen and choose either landscape or portrait orientation
- Click “Save” to pair your display
Some software providers (Evergreen included) have customer support staff who will walk you through the setup process, making implementation smoother and reducing learning curves.
Step 6: Creating Your Digital Beer Menu Content
Menu Design Best Practices
Your content should be clean, brand-aligned, and easy to read from a distance.
Design Guidelines:
- Large Fonts and High-Contrast Colors: Ensure readability from typical viewing distances
- Logical Grouping: Organize items by category (Beer, Cocktails, Food) for easy navigation
- Essential Information: Include beer names, brewery, style, ABV, and pricing clearly
- Visual Hierarchy: Use size and positioning to guide customer attention to featured items
Content Creation and Management
Template Customization:
- Upload images, videos, and text to templates, including beer names, prices, descriptions, and drink pictures
- Use drag-and-drop editors to modify layouts, creating sections for seasonal specials or highlighting featured beers
- Preview your menu before publishing to ensure everything appears correctly
Evergreen’s Beer Database Integration:
Search the online dashboard for beverages and simply tap a button to add them. The platform connects directly to a robust database of over 300,000 beers, making it easy to pull in accurate descriptions, ABV, brewery info, and style tags in seconds.
Advanced Content Features
Dynamic Elements:
- Keg Level Indicators: Display keg levels or “just tapped” banners for real-time inventory visibility
- Rotating Specials: Highlight different featured beers throughout the day
- Social Media Integration: Display social feeds or customer photos
- Event Announcements: Promote upcoming brewery events or special tastings
Step 7: Scheduling and Content Management
Time-Based Content Strategy
Set up time-based menus for happy hour specials, new arrivals, or seasonal beers. The ability to schedule your menu content ensures that promotions are displayed at the correct times.
Scheduling Features:
- Dayparting: Schedule menus to automatically switch based on time of day (lunch, dinner, or happy hour specials)
- Advance Planning: Set content for holidays, special promotions, or seasonal drinks in advance
- Multi-Location Sync: Publish content to multiple locations simultaneously for consistency
Real-Time Updates and Management
Operational Flexibility:
- Give staff access to the dashboard for when they stock a new craft beer or change a keg
- Boards are instantly updated in real-time, with no refresh needed
- Monitor performance and ensure everything runs smoothly by checking your dashboard for screen status and metrics
Step 8: Launch and Optimization
Going Live with Your Digital Beer Board
Launch Process:
- After scheduling, click “Publish” to make your digital beer menu live
- Test all functionality during a slow period to identify any issues
- Train staff on update procedures and troubleshooting basics
- Gather initial customer feedback and make adjustments as needed
Staff Training and Support
Training Components:
- Update Procedures: How to add new beers, change prices, and modify content
- Troubleshooting Basics: Common issues and simple resolution steps
- Customer Assistance: Helping customers understand and navigate the digital menu
- Backup Procedures: What to do if the system goes offline during service
Staff can search, select, and publish new beers from a single dashboard, making updates quick and efficient even during busy service periods.
Troubleshooting Common Setup Issues
Connectivity Problems
Network Issues:
- Verify Wi-Fi signal strength at the display location
- Test internet connectivity with other devices
- Consider ethernet connection for more stable performance
- Check firewall settings that might block the software
Display and Content Issues
Visual Problems:
- Resolution Mismatch: Ensure media player output matches display capabilities
- Aspect Ratio Issues: Verify landscape vs. portrait orientation settings
- Content Not Updating: Check network connectivity and account permissions
- Black Screen Display: Verify HDMI connections and power supply status
Restarting the system is often the simplest but most effective troubleshooting step for resolving temporary glitches.
Maintenance and Long-term Success
Regular Maintenance Tasks
Weekly Tasks:
- Review and update beer selections and pricing
- Check system connectivity and performance
- Clean display screen for optimal visibility
- Verify backup procedures and data security
Monthly Tasks:
- Analyze content performance and customer engagement
- Update software and security patches
- Review and optimize menu layout based on sales data
- Plan seasonal content and promotional campaigns
Performance Optimization
Content Strategy Refinement:
- Regularly update content to keep displays fresh and engaging
- Monitor which beers get the most attention and optimize placement
- Test different layout designs and measure customer response
- Incorporate customer feedback into content improvements
Scaling Your Success
Expansion Considerations:
- Multi-Location Management: Manage digital signage content for entire restaurant chains from a single interface
- Additional Screens: Add displays in different areas or for specific purposes
- Integration Expansion: Connect with POS systems, inventory management, and analytics tools
- Advanced Features: Explore AI-powered content optimization and personalization
Cost Considerations and ROI
Initial Investment Breakdown
Hardware Costs:
- Display Screen: $300-$600 for consumer TVs, $750-$3,940 for commercial displays
- Media Player: $100-$400 depending on chosen platform and features
- Mounting Hardware: $50-$200 for professional mounting solutions
- Installation: $200-$500 if using professional services
Software Costs:
- Evergreen offers transparent pricing starting at $59 per month with comprehensive beer-focused features
- AIScreen plans start at $10/month with 14-day free trial
- Screenly starts at $11 per month per screen when billed annually
Return on Investment
Revenue Benefits:
- 80% of brands using digital signage report increased sales, with some seeing rises up to 33%
- Improved upselling opportunities through strategic highlighting
- Faster customer decision-making and reduced wait times
- Enhanced customer experience leading to repeat visits
Operational Savings:
- Eliminated printing costs for menu updates
- Reduced staff time spent on manual menu management
- Decreased errors from outdated pricing or availability
- Improved inventory turnover through better promotion capabilities
Getting Started Today
Ready to transform your beer menu with digital displays? Here’s your action plan:
Week 1: Planning and Procurement
- Assess your space and determine optimal display placement
- Research hardware options and choose appropriate display size
- Select digital menu software platform and create account
- Order hardware and schedule installation if using professionals
Week 2: Installation and Setup
- Install display and media player hardware
- Configure software account and pair devices
- Create initial menu content and test functionality
- Train staff on basic operation and update procedures
Week 3: Launch and Optimization
- Go live with your digital beer board
- Gather customer and staff feedback
- Make initial content and layout adjustments
- Plan ongoing content strategy and promotional campaigns
Evergreen’s digital beer menu platform provides everything you need for successful implementation, from hardware recommendations to comprehensive software features designed specifically for bars and breweries.
Start your free trial today and discover how easy it is to set up a digital beer board that enhances customer experience while streamlining your operations. With access to over 300,000 beers in our database and seamless integration capabilities, your digital transformation starts with a single click.
See Evergreen’s Digital Menu Software in Action
Join 4,500+ restaurants, bars, and breweries using Evergreen to modernize their menus.
Start Free Digital Menu Trial (No Credit Card)
Trusted by The Griffon, British Beer Co, Whole Foods since 2010

About Casey Marte
Senior Technical Content & Product Marketing Manager, EvergreenHQ
Casey Marte is the Senior Technical Content & Product Marketing Manager at EvergreenHQ, where she turns complex bar and restaurant tech into clear, practical stories operators can actually use. Drawing on years of experience with POS systems, inventory platforms, and front-of-house tools, she specializes in explaining how technology, automation, and AI can simplify daily service and boost profitability.
At EvergreenHQ, Casey partners closely with the product team to shape new features, test tools, and make sure every operator — from a single-location taproom to a multi-unit restaurant group — has the information they need to grow.